Search Results
61 results found with an empty search
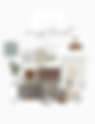
- Nursery Concept Board
So when I found out I was pregnant and heck even before, I had dreamed of designing a nursery. So what does ever woman do? Create a baby room Pinterest board! Follow my board here. The possibilities can be endless when designing a nursery. You get a bit of whimsical creative liberty that you dont necessarily feel with other rooms. Yet I knew I always wanted the room to be an extension of our home with elevated style! I didn't want a space that screamed I am a baby boy or baby girl. I really didn't even want anything too baby-ish in the room, I crave a design that is transitional from birth to toddler age with heirloom pieces to treasure through adulthood. Thankfully I have a great base to start with. A room that is already set up for a nursery including a rocker, crib and dresser! Before I knew what we were having I was really excited to do a little girls nursery. I am a bit more comfortable with a feminine style. Well to really challenge me and my design, we are having a boy! There really isn't a lot of inspiring boy nurseries out there to me. A lot are very "theme" based and it has been a bit of a challenge to create a space he can grow with. Like anytime I am planning a room or design I really try to get inspired with colors, textures, the over all vibe of the room and start gathering some of my favorite pieces and ideas. I create a mood board of all the things I am loving and then start to piece the right things together. I did his about 10 times before I felt comfortable with the over all design idea. Colors changed, some of the ideas changed, I have other furniture options in place, but this allowed me to really visualize it before I made any purchases. I knew I wanted to do something a bit different, ever since I saw the Cole & Son Nuvolette cloud wallpaper a couple years back I have been dying to use it. However, it is so pricy and I have design commitment issues. So I have been on the hunt for a dupe and have found something semi comparable. Its definitely no Nuvolette but at a fraction of the cost I can still get the look I am going for without compromising the rest of the design. The wallpaper I chose will go on the ceiling! That was the initial start of my design, I knew I wanted that specific look. So the rest of my design had to follow from that. Its always good to have a starting point, whether that be a piece of furniture or artwork or overall style to design around. Next for me was to pick out a color for his walls or more of a color scheme for his room. So many colors to choose from all while trying to stay very neutral. For his walls we are going to add molding and I was originally going to keep them white until I stumbled across a few colors I couldn't shake out of my head. The top color is Sherwin Williams Oakmoss, similar to Rosemary but it is definitely more green, and the bottom is Sherwin Williams Halcyon Green. I was torn. The two are completely different from each other and provide completely different vibes. The Oakmoss would be so rich and moody but I was afraid it would be too dark. The Halcyon Green is very muted and a bit of a chameleon color but I was afraid it looked to "baby boy". Ok, well lets jump back to my starting point... the wallpaper! It is really what I am planning my design around so I needed to see which best complimented it. To me its pretty obvious, Halcyon Green is the winner! With the cloud wallpapered ceiling and this paint color on the walls I think this room will look sophisticated yet tranquil and fresh. The beginning of a space I truly think can be transitional no matter the function. We are getting started on his room this week! We have some labor to do first, hang crown molding, the wall molding, patch and fix some areas and update the outlets. But now with this design in the back of my head I can start ordering some of these pieces and keep my eye out for more unique options for his room. I am hoping to find a vintage mirror and maybe some artwork for his walls. We are giving ourselves a good two months to finish his room, which really is pretty quick, since we still have a lot of other on going projects. However, this space is small and a priority and I cant wait to share with you all the finished room! xx. kasey
- Easy Breakfast Casserole
What is better then a make ahead casserole on a busy morning? Pop it in the oven, no fuss or mess in the kitchen and in about an hour you have a delicious breakfast! Every Christmas Eve I make this casserole for Christmas morning so I can spend time with family and not in the kitchen. Any vacation we take this is always such a great recipe to have on hand, it feeds a crowd and frees up your time! There are so many delicious breakfast casseroles out there but this is my all time favorite! It is so easy to customize this recipe based on what sounds best or what I already have on hand. The options are endless with this one and it always turns out oh so yummy! Notes: - Diced breakfast ham is my go to when I'm in a time crunch. - My favorite tater tots are Alexia, I'm sure you could use hash browns as well! - I have had my best luck with Cheddar and Gouda cheeses! Im sure Parmesan, mozzerella or a white cheddar would also make for a great combo! - I use Natures Seasoning more often than salt & pepper combo. I love the extra punch of garlic and onion that is mixed in. If you do not have Natures Seasoning or do not want to try it. Use 1/2 tsp of salt, pepper, garlic powder and onion powder to make 2 tsp of seasoning! * I have cut this recipe in half and it makes a perfect amount for 4 people or 2 people with leftovers! I recommend baking at the same degree and for the same amount of time. I hope you enjoy this simple casserole and put your own spin on it! If you make this, share with me what you did! xx. kasey
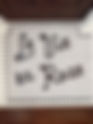
- A bundle of joy
We are having a baby! Here is a little recap of our journey to pregnancy! We had been trying for almost 3 years! Countless doctor appointments, checks, medications, etc. We did a lot of trying and no success. I truly believe in Gods timing and this was perfect in every way. I dont look back with sorrow on those trying times, it was a time for us to grow closer and experience struggle and heartache. I really do feel so happy with how we got here, we have a greater appreciation for each other and life. For all you mommas and dads still trying, dont give up hope and keep that faith. Gods plans and timing are greater than yours and just trust in that. Flash to September 6, 2020. Two pink lines. I never thought this day would come. I couldn't believe my eyes! Brandon was away on a golf tournament so I had the whole day to myself to take 4 more tests and freak out with excitement! I wasn't sure how late he would get home so I didn't want to tell him that night, plus I had to concoct the perfect surprise! If you know Brandon, he loves pizza, like a crazy amount of love. So what better way to tell him than on a pizza? I spent way too much time cutting pepperonis into letters to spell out "you're gonna be a dad". The following day I poured a glass of wine like usual, just to make sure I don't throw him off. We played a movie on the tv and I put the pizza in the oven. When the timer went off I looked at him and asked if he would go get the pizza out of the oven... I was soo nervous and excited for his reaction! Our first ultrasound fell on our 3 year anniversary, again another Gods timing is perfect moment. It was the most beautiful thing to experience and see the little heartbeat. "Another room renovation, our most important one yet!" This journey so far has been such an incredible experience. I felt nauseous through my first trimester but I never got sick. I crave all the slaty foods and carbs! All the old wives tales are leaning toward a boy.. but we shall see! Well a day before my birthday we went to have a 3D ultrasound done to find out the gender... its a ... BOY! we are so overwhelmed with Gods love and excitement for this little one. xx. kasey & brandon
- DIY yarn tree
Want a simple festive DIY? These trees take only a few supplies, most you probably have laying around your house, and creates a cute piece of decor. Make it, frame it, gift it! So here are some supplies you'll need : - Yarn (I chose two colors, green and white) - Scissors - Card (credit card, drivers license, gift card) - Hot glue gun - Stick, yes a stick - go forge your yard for the best looking sticks! - Paper for the background (I used stripes, polka dots, checkered - get creative!) Optional: - Frame - Berries or other decor for your tree Step one: Wrap your yarn around your card approx. 20 times and then snip it. You may do this with your card short or long ways, depending on the size tassel you want to create! Step two: Cut about a 3-4" piece of yarn Step three: Carefully slide your yarn off the card and use your piece of yarn to tie it together about 3/4 the way up. This will leave a small top creating a tassel look. Step four: Cut the bottom loops to create a fringe. Step five: Repeat as many times as necessary for your desired look! Step six: Hot glue to your paper in the shape of a tree, add your trunk (stick) and any other decor to dress it up! Optional step seven: Pop it in a frame, I removed the glass so it gave the picture a better 3D element and texture! Hang up and enjoy! Gift to your neighbor, family or friends! Hope this little DIY was easy and simple to follow along and brought you joy! Merry Christmas xx. kasey
- Foyer Reveal!
We turned our foyer into a foyay! Here is a little before of this space And drum roll please..... After! Pretty much the entire space was transformed. From the front doors, to the ceiling, to the floors, we renovated with respect! We really wanted to make this a grand entrance to set the tone of the house when you first enter. It's always so important for us to stay true to the character and age of our home. It took time for this space to be completed but now that it is we love it so much! We hope that with every guest we have over, they feel welcomed and the love we've put into our home. We has some gnarly textured ceiling we decided to cover up with a tongue and groove planking. This project was really simple over all and brought such a great impact to this small space. Just one tip - stain before you put up! We didn't and it made for a neck breaking task. We needed to apply a couple coats to get the desired look we wanted. We then added crown molding to finish it off! Our next big project was the installation of our new doors! The door we had previously was a single door that was rather wide with a side window. Like many historic homes they tend to have double entry doors and I knew thats exactly what we needed to have! The opening size didn't have to change and we were able to add these gorgeous double entry doors. They provide so much light into our foyer and when the weather is nice we can open them both up and let a breeze in! Our hardware I hand picked from House of Antique Hardware. I wanted something timeless yet with a vintage twist and I think the glass knobs and brass do just that! They are an Emtek product and we have been very pleased so far. Hardware is the jewelry of your home and taking the extra step to make it sparkle really matters! We had been so inspired in Charleston, SC with their old charm and wanted to incorporate that into our home. I think that our homes should tell a story of our life. Our travels, memories, love and experience. Well this beautiful home in Charleston was my inspo for our foyer floors. It took me over 6 months to find the right flooring that I wanted that we could afford and that was durable. Most things I stumbled upon was marble which I couldn't swallow the price tag with the maintenance that it brings especially in a high traffic area. Slate flooring but then I had a hard time with the white. The sizing and the thickness on some products weren't matching up. Some tiles didn't have enough veining in them, some were too shiny. I am telling you, this was a harder task than I anticipated. A good 8 samples or so later... I finally came across the perfect tile for us! It is porcelain so the durability is great. It has a matte finish. Both the white and the black tiles had enough texture and pattern to make them look "old world". BUT of course there was a problem... The black tiles were 13" and the white tiles were 11.85". Sweet Brandon. He cut down all the black tiles to make them the perfect size to match the white tiles and then baby, we were in business! Some other things we did to this space was change the light fixture, add wainscoting to the walls and painted! Although this space is fairly small, it has a big impact. With it being one of the first rooms that welcome you into our home we wanted it to sing with character. Overall this space took us about two years to transform from start to finish. Sometimes projects take longer than expected but it is always worth it in the end. Sources Wall color: Bistro White by Valspar Prints are vintage Doors: Pella Hardware: House of Antique Hardware they have the best customer service and we had all our exterior locks to be keyed the same! Light Fixture: Pottery Barn (our exact one is no longer sold) Ceiling wood: Tongue and groove planking Stain we used for the ceiling: Minwax Dark Walnut Floor Tile: White / Black with a dark gray grout xx. kasey
- Front porch sittin'
Living right on Main St. I think it is pretty important to have some good curb appeal and a nice front porch. Well lucky for us we have the porch but we are still working on that curb appeal! I do think this impromptu front porch redo has really helped give it some more charm! So let me back up. We had zero intentions of starting this project when we did. I had purchased some antique spindles a couple months back and sketched up this drawing for a new porch swing. I presented the plan to my dad and husband and they brought life to my dream! Well, when it came time to hang the porch swing we ran into an issue with make sure it was in the right spot. Our entire house, porch included, has been covered in vinyl siding. We have always wanted to remove the vinyl and restore the old wood siding... but thats a bigger and more expensive job for another time! So to do this right the first time around we decided to remove the vinyl ceiling to get the porch swing hung. If you know us, we cant just stop there. Oh whyyyy cant we just stop there sometimes?! We took all the siding off of the porch which uncovered the beautiful old wood siding but also led to some serious work. It took us about a month from start to finish to get this project complete. Honestly, that was pretty quick for us but with the warmer weather upon us we really wanted to enjoy the front porch and we had the pressure of being right on Main St! We had to remove all the nails from the siding, patch all the holes and sand! We had areas to fill with spray foam, add trim and patch. We needed to redo the front door header, trim and all the trim around the windows. We also added crown moulding to fill a gap and add an extra design element! Primed the entire porch twice, painted the siding and the ceiling! A lot of cleaning and then the decorating could begin! We love how this turned out and enjoy spending time on our porch. It is so important for us to restore our home and bring it back to its original beauty. We still have plans to remove the rest of our vinyl and paint our home but until then we will just enjoy the sweet original character we uncovered here! If you want to see more behind the scenes, hop on over to my Instagram and watch the front porch highlight! Sources: String Lights Macrame Curtains Rug Exterior paint color: Bistro White Valspar Ceiling color: Waterscape Sherwin Williams xx. kasey
- A trip to the Carolinas!
Brandon and I headed out on a much needed fall vacation to the Carolinas! We had gotten engaged 3 years back in Asheville and had been dying to go back and explore just a little bit more. So we head out on the long journey to Asheville, NC. Our first trip down we took the Blue Ridge Parkway and we knew this time around we wanted to take it again! It definitely adds a lot of time to the trip but it is well worth it, especially in the fall. We took plenty of snacks and stopped often to take in the view and explore. We were so lucky to have such a beautiful day with all the perfect fall colors. Just right off the BRP we stopped at Linville Falls Winery to stretch and taste some wine! It was a cozy little place to enjoy a glass and we took a bottle to go! Once we got to Asheville we checked into our hotel and went for dinner and then downtown to explore all their great breweries! You really cant go wrong hopping around downtown. We stumbled upon The Times Bar and we absolutely loved it! The bar was so esthetically pleasing and the cocktails were absolutely amazing. Before we headed out on our voyage to Charleston we grabbed breakfast at Early Girl Eatery. It did not disappoint! We really wanted to go back to Biscuit Head where we had been before but they were closed. On our way to Charleston we stopped in Tryon, NC and if you are an antique lover like us you must stop! We stumbled upon 3 right in a row - Architectural Warehouse, Tryon Antique Mall and Dark Horse Antique Mall. Let me tell you, they all had such great unique things to offer and I wish we had more time to shop around. But, Architectural Warehouse was ah-mazing! The collection of antiques from chandeliers to leaded glass windows to doors was incredible! We made it to Charleston, my absolute favorite city of all times! This was probably my 6th time here and I fall in love all over again each time. There is always SO much to do, sooo many great places to eat and drink and the southern architectural design takes my breath away. We checked into our air bnb which I was most excited about because it was completely different than anything I have ever stayed in before! Hemingways Hideout is a 1948 yacht. It was such a unique experience to sleep on a boat. There were a handful of other boats docked around us but ours was located with the best view and felt the most private. We explored, ate and drank our way through Charleston for the next 3 days and loved every minute of it. You honestly cannot go wrong with any restaurant you go into, any street you walk down or beach to visit! This trip we went to some of our favorites and also explored some new things! Gin Joint I love this place! It's a bit speakeasy, tucked away with such great cocktails! My personal favorite is the bartenders choice which you choose 2 words from a list and the bartender makes you a drink out of your two chosen words. Such a fun concept to try something new! 5Church A unique place in an old church to eat or just grab a drink! Cypress Gardens Look familiar? This is the famous scene from the Notebook when Noah takes Ali out in a canoe! We were able to self guide our own canoe through the gardens and it was so beautiful! Keep your eye out for alligators! Carmellas Cafe Such an adorable place for dessert. We indulged in some champagne and a cake while we waited for our dinner reservations! Yes, dessert before dinner! Amen Street Ive had dinner here before and it is always outstanding. We dinned al fresco under the moonlight and buzz of downtown. Of course we had an oyster shooter, or two! No matter the amount of time I spend in Charleston it never feels like enough time. I am always eager to get back and enjoy the delicious food and great southern charm. However our time had come to an end and we were off to Wilmington to spend a couple days with some great friends! We had also been to Wilmington before and love it just as much. Plenty of great food, bars and beaches! We of course had to eat at the infamous Fork N Cork, come with a big appetite because wow its a lot of amazing food. A new place we had checked out was Satellite Bar & Lounge, they have such a great outdoor space where we were able to play corn hole and just relax. The memories we made with our friends, exploring new places and the great food we experienced was all unforgettable. We had such a quick, yet amazing trip! Till next time Carolinas! xx. kasey
- Wine not?
Who doesn't love a good winery? Now Ohio isn't necessarily known for their wine but I will say we do have some awesome wineries! I put together a little guide of our favorite spots to sip wine around our area of Ohio! First up, my all time favorite Autumn Rush Vineyards! Not only do they have great wine, they typically have live music and a food truck too! We absolutely adore the sweet owners and put this winery on our must do in the summer time! Not too far from Autumn Rush you'll stumble upon Three Oaks Vineyard. What a sweet hidden spot to feel so secluded! Headed down toward Lancaster, OH you'll come across my next favorite winery, Rockside Winery and Vineyards! The Town Square is my favorite and you can cozy up in the winter time with a warm glass of their mulled wine! Head on over to Buckeye Lake and grab a bottle of wine and sit out by the lake at Buckeye Lake Winery! This is a great place to relax on the lake, eat a delicious meal and listen to some live music in the summer! If you head north you will reach Wooster which is home to Blue Barn Winery! Where we just happen to appear on the website, our first trip there! Pack some snacks or purchase one of their charcuterie boards and settle in with a good wine! The almost always have live music and such an inviting atmosphere! These are just a few of our all time favorites! We have so many more to explore. Check out Explore Licking County to pick up one of their beverage trail guides to let you explore all the other places! Cheers! xx. kasey
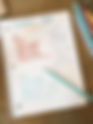
- Word Tile
This project is hands down my most favorite we have done so far! I have been pinning and saving word tile for some time now. I always knew I wanted to do this but I just wasn't quite sure where I wanted to do it at. I had the chance to design a salon and we are incorporating word tile in the bathroom. Well it really got my wheels turning about how much I love it and where could I design it into our home? We don't have many spaces that are in need of new flooring... until I remembered.. this little landing that leads to our basement and a door to our side yard. Originally it had tile on it, travertine, which we had since removed and unearthed the natural oak wood flooring, swoon! Well this space is such a high traffic and nasty area between our unfinished basement and the unfinished side yard that it was begging for tile. But not just any tile.. it needed character and charm and I knew exactly what to do. It was a Sunday morning, I woke up with a wild hair ready to take on the day and a new big challenging project. I swung the idea by Brandon and to my surprise he said YES! So off to the tile store we went. Classic black and white hexagon tiles was what we were after. When you put us in a tile store it is like a kid in a candy shop. So hard to focus when there are other shiny things. So we came home with the tile, and a new marble sink. Never. Fails. Ok so lets get started.. Well I had NO CLUE what we were going to write. We went back and forth on writing the original owners last name Mead... we thought about writing Est. and then the date of when our house was built, problem is.. we aren't certain on when our house was built. We didn't want it to be too personal that when we moved someday our last name was tiled into the floor.. I wanted it to be fun yet meaningful. So I kept thinking about this house and how we are making it our home.. how it tells a story of our life. It came to me. La Vie En Rose. This is our wedding song and truly the way we love to live life. Looking at life through rose colored lenses. Brandon and I really do try to live life really positively. We see the good instead of the bad, we celebrate everyday. Thats our love too. So now that I know what we are writing it is time to figure out the layout while Brandon preps the floor. This was super challenging. I wanted the font to look cursive and not to mechanical looking. Figuring out the right sizing and placement was tough. With a lot of trial and error I finally pulled it all together. I snapped a photo of it and counted the tiles so I knew how to recreate this. Ok, the floor is ready but we wanted to make an exact dry fit so we knew where to place the words and how it would read from the top of the stairs. We were trying to figure out the boarder as well. Since this is an old home, nothing is straight or level so it was a bit of a struggle lining it all up to look and be as straight as possible. So the next step was to remove the white tiles where the black tiles were going to go. I marked them with a blue sharpie and peeled them off as I went. I had a system down so I didn't mess up! I added two little flowers off to the side, one for me and one for Brandon. Ok lets lay some tile! It took some adjusting but once we got it we had to hustle to get the black pieces in and set before the mortar started drying. This was a back breaking process, especially when you have a 7 month pregnant belly along for the ride! But we did it and it was well worth it! BEFORE So this is where we started a couple years back. In time we removed the travertine, changed the door, painted and now retiled and gave it life again! AFTER This space is so much brighter and a lot more fun! I absolutely love how it turned out. It is an homage to our marriage and a sweet reminder. I love the character it adds to our home, how it tells the story of us and our life. That is how I want to tackle each project, big or small. With intention for our home to showcase our memories. All in this project was around 18 sq ft. and cost us a little under $200. We have all of the tools for tile. So our expense included tile, quarter round, mortar, grout, and concrete board. It took 3 days, not full days, but between mortar and grout drying we started on Sunday and finished on Wednesday! Not a bad little project for the sweet memory it now holds. xx. kasey
- Nursery Update 2
So we have made a lot of progress on his room! We have finished all the hard stuff, paint, wallpaper, etc.. now is the fun part! Decorating! Finally seeing his room come to life is so exciting. Lets start with this Ikea shelf I decide to turn custom! I am sure you are familiar with all of the Ikea hacks out there and how to make Ikea look custom. Well here is another one to try! I picked up this picture ledge for $15! The dimensions are a little to long for my space and the shorter options of this ledge are too short, so I decided to have Brandon cut it down to 36" instead of the 45" that it comes as. The 36" fits perfectly on the wall that I am planning for. Brandon said cutting this down was easy, it's made from MDF. He took it shorter on both sides so it didn't mess with the predrilled holes for the wall screws. Well, you know I am not just going to leave it white. So I decided to paint it! I painted it the same color as his walls, Sherwin Williams Halcyon Green. I wanted this shelf and space to have more of an intentional design behind it. Painting the shelf the same color as the wall not only makes the shelf look custom but it makes the shelf look like an extension of the wall. So after a couple coats of paint and letting it dry I wanted to see how it looked. I love it!! I love the tone on tone and how custom it now looks. By the way, it did paint up well. It definitely needed a few good coats and I would certainly recommend a light sand or primer on it before if it is something that would be used a lot. But since this is just a shelf that will hold pictures and books I knew it wouldn't be "high traffic" so I was fine skipping some prep work. I absolutely love how it turned out! Just another thoughtful detail that elevates the design! Now we are working on painting his crib! Here is the before... So a little back story, this crib was mine when I was a baby. My parents found it in a barn and restored it and I used it. Then my Aunt used it for her son and painted it this green color. Well now it is mine to use for our son. We are painting it oil rubbed bronze to bring it back to what it used to be! It is in such great shape so we decided to use Rust-Oleum Oil Rubbed Bronze spray paint. It covered so well and the crib now looks refreshed! I am waiting on the rug and other decor to arrive and then we are finished with his room! I cant wait to share the big reveal! xx. kasey
- 7 months
7 blissful months This has been the sweetest blessing and I know the best is still to come. No one can prepare you for pregnancy and the 9 month journey you embark on. So many things are constantly changing, your body, emotions, energy all to change again once the baby arrives. Change is the only constant. Everyday the love for my son and my husband grows. All I know is the heartburn, insomnia, uncomfortable clothing is all worth it. And this is only temporary. It is a season that I will never get back. If we are blessed to have another child I will be able to experience this all over, but it still won't be the same. This is sacred. A time just me and my husband get to have and cherish. I am trying to slow down and enjoy these moments. Stillness, quietness, freedom. It is all going to change, forever. It is a really bittersweet feeling to have. I am so excited for our family to grow, I am so excited to meet our son and raise him, I am so excited for these changes. But in all honesty, I am also a bit fearful. This life that I have known and been used to for so long is now about to change in a way I cant even begin to imagine. Its so beautiful, yet nerve wracking. I couldn't be more grateful for this. To experience pregnancy, to carry our son and feel his kicks, to grow not only physically but emotionally and mentally. I thank God for this incredible blessing and all that is to come! So here is to the last two months of being pregnant and carrying this sweet boy. Although I am so excited to meet him, I am patiently enjoying this season. xx. kasey
- New year, improved me
So how is the first bit of this New Year treating ya? Just because the calendar reads a new year does not mean you need to set out on unrealistic goals, new year new me attitude. Be you, the same you. Just improve you, if that’s what you want. Be the best you. If you haven't done a year in review check it out here.. it really helps adjust your mindset with reflection and outlook. Take a moment to look ahead at the new year, who do you want to be in 6 months from now? Set yourself up for success and set some goals! Nothing better than to jump start your year with realistic expectations. A new year always comes with the hopes of big change and a feeling of a fresh start. Wellll just because the calendar reads another day and a different year, you are still the same person you were yesterday. But if you want change. You want to celebrate life. You want to accomplish those goals, start of small.. Life is about the small victories that make big impacts! You got this, make this year the best one yet, regardless of life's uncertainties. "The longer I live, the more I realize the impact of attitude on life. Attitude, to me, is more important than facts. It is more important than the past, the education, than money, than circumstances, than failures, than successes, than what other people think or say or do. The remarkable thing is we have a choice every day regarding the attitude we will embrace for that day. We cannot change our past. We cannot change the inevitable. The only thing we can do is play on the one string we have, and that is our attitude. I am convinced that life is 10% what happens to me and 90% how I react to it. And so it is with you. We are in charge of our attitudes." Charles Swindoll If that quote doesn't shake ya, check your pulse. It's up to you. So lets make some goals! In order for the things you want to really happen you need to manifest them. Write them down and look at it often, check in with yourself. See how far you've come, what you didn't accomplish and why. The most important thing is to allow yourself to dream big, reel it in with short term goals and give yourself grace! There are so many things out of our control, so when things dont happen, dont be down on yourself.. just ask yourself why. If you were the reason you didn't accomplish what you wanted - thats on you and remember that. Don't blame the world. Now if obvious things aren't happening because of specifics like money, resources, etc.. thats where you give yourself grace. Pause. Reevaluate. Sometimes those goals just aren't ready for you yet. And learn to be OK with that. We are all different, I am just going to share what works for me. I typically love to plan far ahead (with realistic AND unrealistic expectations). I break the year into quarters. Quarter 1 Jan-March (winter) Quarter 2 April- June (spring) Quarter 3 July- Sept (summer) Quarter 4 Oct- Dec (fall) This helps me stay on track and organized without feeling so overwhelmed with 12 months ahead of me. It also helps me set better short term goals and be able to pause and have reflection. This is also so handy in Ohio because that basically broke down my seasons. Which helps me "plan" for specifics. Again, I am a little OCD with planning so take what you want, or take nothing, and plan ahead, set those goals and make it happen baby! So starting with quarter one.. which then I do with each quarter.. I brain dump all of the things I want and need to do and then break that down into the appropriate month. I try to keep it kinda simple and then branch off from there. Example.. Then I break it down into my months by prioritizing it all. I put it on my calendar so I dont forget and I can keep myself accountable. So starting with January here is an example of what it would look like for me- January Goals- Home: - Start remodeling the nursery - Clean & organize the basement - Finish painting the foyer Personal: - Set goals - Start a workout regimen - Cook something new / this is what I am going to try! - Spend time with my mom - Start school Fun: - Go hiking - Check out the new restaurant down the street - Go to the Outlets *Remember, these are your goals, make them small or big. Whatever you achieve is success! Do not let fear get in the way. Take a moment and read this article if fear is what keeps you from living. This has been so helpful for me to stay organized and on top of the things I actually want to do. Its so easy for us to set out on a new month or year with expectations but if there isn't action behind that then we are really setting ourselves up for disappointment. This life is meant to be lived! So lets live it and live it well. If you need some inspiration for January, check out this post. xx. kasey